
To make a how do you make a diaper cake, start by rolling individual diapers and securing them with rubber bands. Then, arrange the rolled diapers in tiers to form a cake shape, securing each tier with ribbon or string.
Finally, decorate the cake with baby items, such as bibs, pacifiers, and baby socks.

Choosing The Right Supplies
Choosing the right supplies is an essential step when it comes to making a diaper cake. Whether you are planning to gift it at a baby shower or use it as a centerpiece for your own nursery, having the right materials can determine the success of your creation. In this section, we will cover the two main aspects of choosing supplies for a diaper cake: selecting the diapers themselves and gathering additional supplies.
Selecting The Diapers, Make a diaper cake
When selecting the diapers for your diaper cake, it’s important to opt for high-quality, newborn-sized diapers. These diapers are perfect for creating the base layers of your cake and are more likely to be useful for the new parents. To ensure you have enough diapers, calculate the number of layers you want and multiply it by the number of diapers per layer. Remember to consider whether you want to use disposable or cloth diapers, based on the parents’ preference.
Gathering Additional Supplies
In addition to the diapers, there are other supplies you will need to create a diaper cake. Here is a list of essential items you should gather:
- Rubber bands: These will be used to hold the layers of the cake together.
- Ribbon: Choose a ribbon that matches the theme or color scheme of the diaper cake. This will be used to secure each layer and add a decorative touch.
- Adhesive tape: Use this to secure the ribbon in place and for any other minor adjustments you may need to make.
- Decorative items: Personalize your cake with cute baby items such as pacifiers, onesies, rattles, or plush toys.
- Cardboard or cake base: To provide stability to your cake, use a sturdy cardboard base or a cake stand.
- Scissors: You will need scissors to cut the ribbon and any other materials.
By having all these supplies ready, you will be fully prepared to create a beautiful and functional diaper cake. Keep in mind that you can also get creative and include additional items that suit your personal preferences or the parents’ preferences. Now that we have covered the supplies you need, let’s move on to the next step: building the layers of the cake.
Creating The Base
When making a diaper cake, starting with a solid base is crucial for stability and structure. Let’s break down the process of creating a sturdy base for your diaper cake.
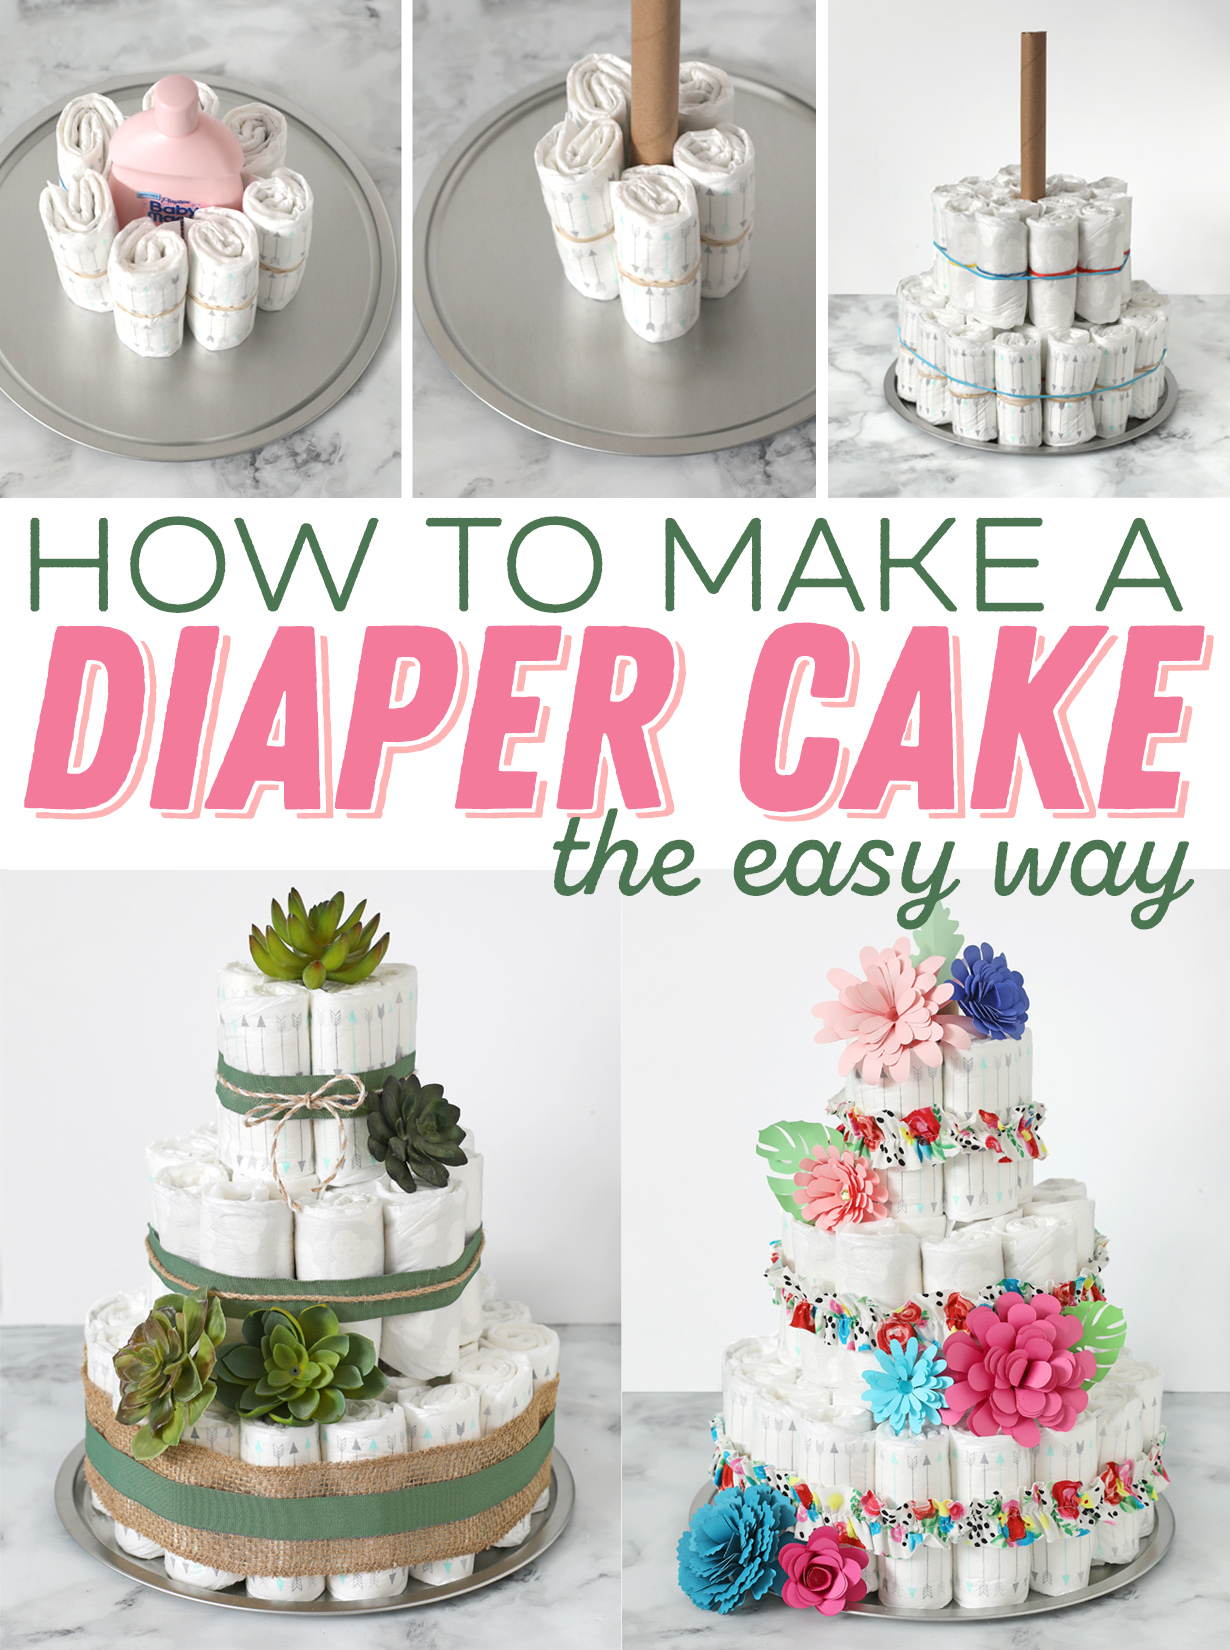
Forming The Center Of The Base
To begin, take a round cake board or a sturdy plate as the foundation of your diaper cake base.
- Place a large roll of paper towels or a tall bottle of lotion in the center of the board.
- Surround the center item with diapers, standing them upright in a circle around the center.
Adding The Outer Layer
Next, create an outer layer by adding a second circle of diapers around the first layer, slightly overlapping them.
- Continue adding more diapers in concentric circles until the base is the desired size and thickness.
- Secure the outer layer with a ribbon or string to hold everything in place.
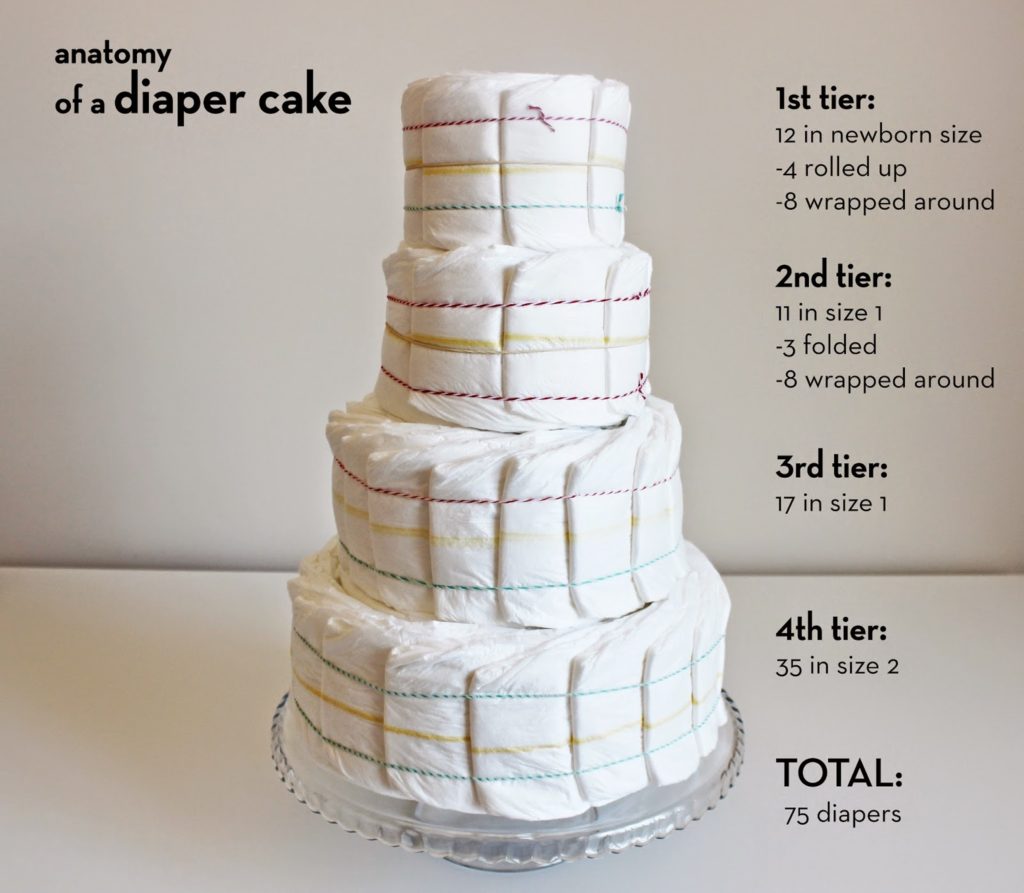
Building The Tiers
When building a diaper cake, constructing the tiers is a critical step that requires attention to detail and a bit of creativity. The tiers form the foundation of the cake, and getting them right sets the tone for the rest of the process.
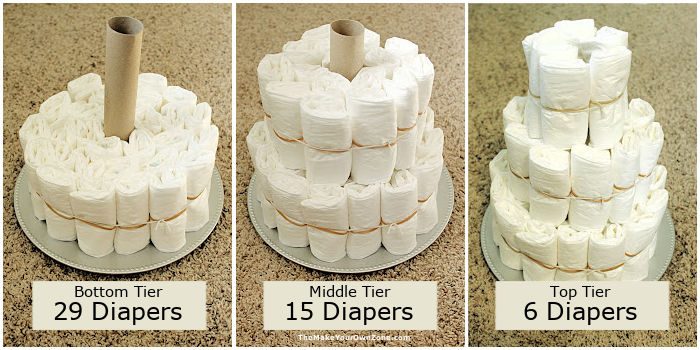
Assembling The Bottom Tier
- Start by placing a round tray or cake board on a flat surface as the base of the diaper cake.
- Roll up the diapers and secure them with rubber bands, then arrange them closely together around the edge of the board to form the first layer.
- Wrap a large rubber band or a piece of ribbon around the first layer to secure it in place and to provide additional support for the next tier.
- Ensure the diapers are neatly aligned to create a smooth and even base for the next tiers.
Constructing The Middle And Top Tiers
- Repeat the process of rolling and securing diapers for the subsequent tiers, using smaller trays or cake boards for each layer.
- Place the middle tier on top of the bottom tier, ensuring that it is centered and stable.
- Continue to build the layers upward, securing each tier with ribbon or rubber bands and adjusting the diapers to maintain a uniform appearance.
- As you reach the top tier, consider using a baby bottle or a small plush toy as the cake topper to add a decorative touch.
Decorating The Diaper Cake
The final step in creating a diaper cake is the exciting part – decorating it! This is where you can let your creativity shine and add those special touches that make your truly unique. In this section, we will explore two ways to decorate your cake: by adding decorative elements and by personalizing it with baby items.
Adding Decorative Elements
Adding decorative elements to your diaper cake not only enhances its visual appeal but also makes it a charming centerpiece for a baby shower. There are several options to choose from.
1. Ribbons and Bows: Attach colorful ribbons and bows around each tier of the diaper cake. You can use ribbons in various widths, patterns, and colors to match the theme of the baby shower. (+8)
2. Paper Flowers: Create delicate paper flowers using colored tissue paper or scrapbooking paper. These flowers can be positioned between the diaper layers or placed on top of the cake as a lovely finishing touch. (+8)
3. Stuffed Animals: Add a cute touch by placing small stuffed animals on top of the diaper cake or nestled between the layers. Choose animals that are relevant to the theme or simply opt for adorable plush toys that will delight the parents-to-be. (+14)
4. Baby Socks and Booties: Use baby socks or booties to embellish the diaper cake. Attach them to the ribbon or tuck them between the diaper layers. This adds a playful, baby-centric element to your creation. (+13)
5. Miniature Baby Accessories: Incorporate miniature baby accessories like pacifiers, rattles, or baby bottles. These can be secured to the diaper cake with the help of toothpicks or ribbon, adding charm and uniqueness to the overall design. (+17)
Personalizing With Baby Items
Personalizing your cake with baby items adds a sentimental touch and makes it even more special. Here are some ideas to make your diaper cake unique and meaningful.
- Baby Blanket: Wrap a soft and cozy baby blanket around the base of the cake. Not only does this add a decorative element, but it also provides a useful gift for the new baby. (+14)
- Baby Shoes: Place a pair of adorable baby shoes on top of the cake. These tiny shoes will not only make your cake look charming but will also serve as a sweet keepsake for the parents-to-be. (+15)
- Baby Photos: Attach small photos of the expecting parents or ultrasound images to the ribbon or stick them to the diaper cake layers. This personalizes the cake and creates a heartfelt connection to the new family. (+17)
- Baby Toys: Incorporate small baby toys around the diaper cake to make it visually interesting while also providing additional gifts for the baby. Consider using toys that match the baby shower theme or represent the parents’ hobbies or interests. (+20)
Remember, the final look of your should reflect your creativity and the personal touch you want to add. These ideas are just starting points, so feel free to combine different elements or come up with your own unique decorations. Let your imagination guide you as you personalize and decorate your cake, creating a special keepsake for the new parents.
Final Touches And Presentation
After creating the diaper cake layers and adding the decorative elements, it’s time for the final touches and presentation to make your creation truly stand out. This is where you can secure the layers in place and ensure the diaper cake looks stunning when it’s presented to the lucky recipient.
Securing The Layers
To prevent the layers from shifting or getting damaged during transportation, carefully secure them in place using clear rubber bands or decorative ribbons. These provide stability while maintaining the aesthetic appeal of the diaper cake. You can also use adhesive dots or hot glue to further strengthen the layers if needed.
Presenting Your Diaper Cake
When presenting your diaper cake, consider placing it on a decorative cake stand or a sturdy platter to elevate its visual appeal. Adding finishing touches such as ribbons, bows, or personalized tags can enhance the overall presentation. Ensure the diaper cake is positioned in a well-lit area to showcase its intricate details and craftsmanship, making it a delightful centerpiece for any baby shower or celebration.
How Do You Make A Homemade Diaper Cake?
To make a homemade diaper cake, gather diapers, rubber bands, ribbon, and decorations. Roll up individual diapers and secure with rubber bands, then arrange in layers, stacking to form a cake shape. Wrap each layer with ribbon and add decorations for a personalized touch.
How Do You Make A 3 Tier Diaper Cake Without Rolling It?
To make a 3-tier cake without rolling, stack diapers in each tier using rubber bands to secure them.
What Size Ribbon Do I Need For A Diaper Cake?
To determine the size of ribbon you need for a diaper cake, measure the circumference of the cake and add a few extra inches for tying a bow. Wrap the ribbon around the cake to ensure it will fit. Generally, 2-3 yards of ribbon should be sufficient for most diaper cakes.
How Do You Make Homemade Diapers?
To make homemade diapers, cut fabric to size, sew absorbent layers together, add elastic for fit, and fasten with snaps or Velcro. Customize to fit your baby’s needs and style. Try using organic, sustainable materials for an eco-friendly option.
Conclusion
Creating a diaper cake may seem like a daunting task, but with the right steps, you can easily master this craft. By following our simple instructions, you can create a personalized and practical gift for any baby shower. Remember to choose high-quality diapers, be creative with your decorations, and have fun throughout the process.
Your beautiful and functional diaper cake is sure to wow the new parents and become a memorable centerpiece at any baby shower. Happy crafting!


